Looks pretty good, right? I decided to use a friendship bracelet technique to make the collar. I have no idea what type of bracelet this is, I just did it from memory.
I started by knotting all three cords together and attaching to the cup hook. Then I started tying my knots. I realized that my center rope was not working - way too slippery and the outside started bunching up too much. I went to the garage and stole, I mean, borrowed a piece of nylon rope from my husband's work bench. That worked out much better.
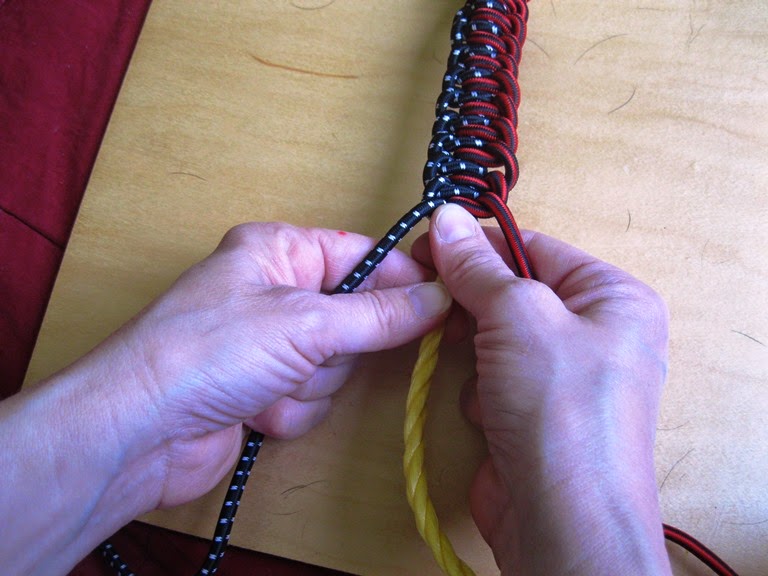
I started with the right cord. I looped it over the yellow rope, then under the yellow rope and then over itself, as shown above. And yes, that is Tazer hair all over the board. He desperately wanted to see what I was doing.
Then I pulled it tight. I did the same thing with the left side.
Every couple of knots, you'll want to tighten them up. To do this, just grasp a cord in each hand and pull the yellow cord down with your thumb forefinger, while you push up with your other thumb and forefinger. You don't have to push too hard. Just a nice gentle push works fine. Keep doing this until your collar reaches its desired length.
Pretty quick and easy, right? Just blowing through this and feeling smug that this is so easy and I'll be done in no time! But now I need to attach the clasp. Talk about turning the air blue...
All you gotta do is thread the cords and rope through the slots. HA! The bungee cords were easy enough, but the rope was a *&^%! And wait til you get to the other end of the collar. After you unknot the first knot you made, you need to thread it through the other half of the clasp! Which is the one you have to thread through the first slot, then a second slot. And while you're at it, make sure when you thread the second clasp, you have it facing the same way as the first. It's extremely, extremely maddening to realize you have to undo, then redo a clasp because they're facing opposite directions. After all the contortions threading it, now you need to weave the ends under the first couple knots. Thankfully, bungee cords are stretchy, or I would not have finished this. Seriously, I was quite hostile after trying to thread them on the clasps and if weaving them under the knots would've been as difficult, I would've probably burst a blood vessel. I kid you not
After I did that, I trimmed the ends of the yellow rope and melted it together with a lighter. Which I would only recommend with a nylon rope, otherwise you could end up with a flaming mess. The bungee cords I tied together using a surgeon's knot, which is just a double overhand knot. See how to do it http://beadwork.about.com/od/howtos/ss/surgeons_knot_2.htm.
See how handsome my big boy looks? That makes it worth the all the frustration!
Until the next project,
Chris :)


No comments:
Post a Comment