Tuesday, May 27, 2014

Bungee Cord Dog Collar Re-Using Old Collar Parts

My dog, Tazer Gunn, is a big boy. He's outgrowing all his collars at an alarming rate and finding cool new collars isn't easy. He needs an x-large and the inexpensive ones are boring, while the cool ones are god-awful expensive. I just happened to be wandering the clearance aisles of Michael's and found bungee cord on clearance for just 49 cents per 16 foot bundle! Score! I've seen bungee collars, and figured I could do that too. So I picked out two colors I thought would look good together, until my son informed me that boy dogs DO NOT wear aqua blue. Even if it's only a small amount in a black and white pattern. So, I ditched the blue for red. And I do like red. But I still think the aqua would've looked cooler.


Looks pretty good, right? I decided to use a friendship bracelet technique to make the collar. I have no idea what type of bracelet this is, I just did it from memory. 


All you need is two colors of bungee cord (I used about 14 ft of each color to make a 30 inch collar), a piece of rope for the center about 6 inches longer that the length of your collar (mine was leftover from an ill-fated dog toy attempt), collar parts (I used a collar Tazer outgrew) and something to hook your collar on while you're working on it (I used a board with a cup hook screwed into it. I used to use it to make friendship bracelets for my daughters). 

I started by knotting all three cords together and attaching to the cup hook. Then I started tying my knots. I realized that my center rope was not working - way too slippery and the outside started bunching up too much. I went to the garage and stole, I mean, borrowed a piece of nylon rope from my husband's work bench. That worked out much better.


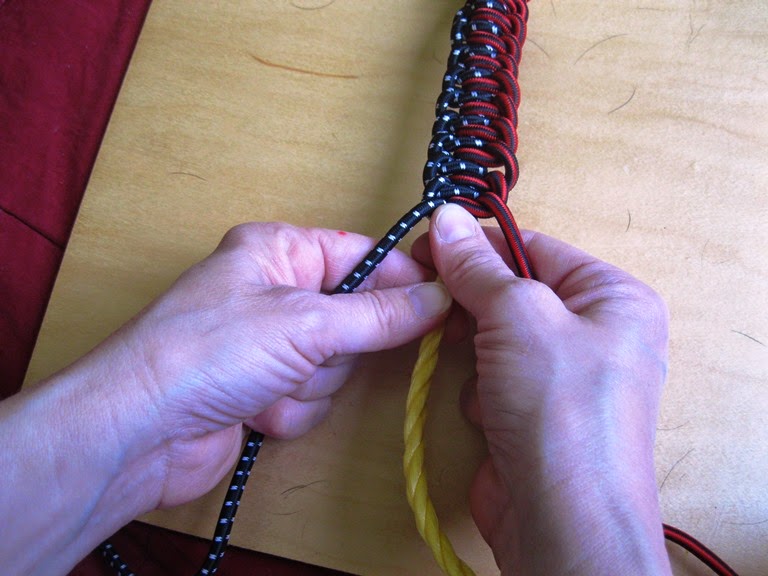
I started with the right cord. I looped it over the yellow rope, then under the yellow rope and then over itself, as shown above. And yes, that is Tazer hair all over the board. He desperately wanted to see what I was doing.


Then I pulled it tight. I did the same thing with the left side.


Every couple of knots, you'll want to tighten them up. To do this, just grasp a cord in each hand and pull the yellow cord down with your thumb forefinger, while you push up with your other thumb and forefinger. You don't have to push too hard. Just a nice gentle push works fine. Keep doing this until your collar reaches its desired length.

Pretty quick and easy, right? Just blowing through this and feeling smug that this is so easy and I'll be done in no time! But now I need to attach the clasp. Talk about turning the air blue...

All you gotta do is thread the cords and rope through the slots. HA! The bungee cords were easy enough, but the rope was a *&^%!  And wait til you get to the other end of the collar. After you unknot the first knot you made, you need to thread it through the other half of the clasp! Which is the one you have to thread through the first slot, then a second slot. And while you're at it, make sure when you thread the second clasp,  you have it facing the same way as the first. It's extremely, extremely maddening to realize you have to undo, then redo a clasp because they're facing opposite directions.  After all the contortions threading it, now you need to weave the ends under the first couple knots. Thankfully, bungee cords are stretchy, or I would  not have finished this. Seriously, I was quite hostile after trying to thread them on the clasps and if weaving them under the knots would've been as difficult, I would've probably burst a blood vessel. I kid you not


After I did that, I trimmed the ends of the yellow rope and melted it together with a lighter. Which I would only recommend with a nylon rope, otherwise you could end up with a flaming mess. The bungee cords I tied together using a surgeon's knot, which is just a double overhand knot. See how to do it http://beadwork.about.com/od/howtos/ss/surgeons_knot_2.htm


See how handsome my big boy looks? That makes it worth the all the frustration! 

Until the next project, 
Chris :)

Sunday, May 18, 2014

Distressed "Vintage" Rustic Mason Jar Bookends

I have a lot of cookbooks. And I don't want them cluttering up my valuable counter space. And the space above my cabinets is largely unused, except for a few decorative items. So I stored them on top of my cabinets, using mason jars filled with dried beans as bookends. I even painted the lids red, so they would match my kitchen. But, as you can see, that was a disaster...


But with a little paint and sandpaper, my cookbooks now look like this...


Before, every couple of days, I'd have to haul a chair over and straighten the *&%#! things up. The cookbooks were too heavy for the jars. I thought about putting rocks in, but then you would see them in a clear jar. It needed to be opaque.  I've seen distressed, rustic-looking mason jars on etsy and loved them. But I'm too cheap to even think of paying $7-$8 per jar when I can make them for a lot less. When buy it, when you can make it? I was looking for a matte red spray paint in a cherry red color, not dark red, not orangey red and not hi-gloss super shiny red. That, my friends, was not an easy task. I just happened to be wandering through Michael's (or was it Joann? I'm always at one or the other) with a coupon burning a hole in my pocket, when I found it (cue heavens opening and angels singing). Chalky finish paint. And they showed a distressed mason jar project. I was obviously looking for the wrong thing all along, so I was pretty happy that the craft gods saw fit to smile upon me.

I went home and routed through all my canning jars (I can every summer and I have loads of them) looking for ones that had chips and stains (I wouldn't use those for canning anyway) and found some that I assume were vintage. I did check to make sure that none of them were rare, valuable jars that could fund my children's college educations. But none of them were. Bummer.

Chalky finish paint is a water-based paint that can be used on a multitude of surfaces and is easy to distress. It's a little thicker than craft paint. I used a foam brush to apply it, taking care to smooth out the streaks. 


The first coat looks very streaky; it takes about four coats to get full coverage. And I didn't have to wait too long between coats, maybe 20-30 minutes. After four coats on the jars, I flipped them over and painted the necks. This way, I got coverage that went all the way to the bottom of the jar without getting paint all over my hands (and everything else). 


I let the jars dry overnight, then got out my medium grit sanding block and went to work.

I just distressed the logo so it would stand out. I didn't want to distress it anywhere else, since I was putting rocks in it. If I were using it as a vase, I would probably distress it more. Here you can see the difference...


After I sanded these babies, I needed to seal them so the paint wouldn't become scratched. I had a satin finish sealer on hand, so I tried it on one jar. It was too shiny, so I had to put on decent, presentable clothes and venture out and get matte finish. That looked perfect. Once you seal it, you can use it as a vase, but do not submerge or use soap and water to clean the outside. Just a wipe down will do.


After that was done, I went outside, found some rocks  (heavy and cheap!) and filled up the jars, screwed on the lids, and I was done! My cookbooks stay put and my kitchen looks organized and awesome. Which is pretty darn cool, if you ask me!

Until the next project, 
Chris :)

Monday, May 12, 2014

DIY Wig Using Yarn And An Old Swim Cap!

My son's class is doing a wax museum at school this week. Each kid picked an explorer, researched and wrote a biography about him (or her). Now they are dressing up as their explorer and parents, grandparents and other students will come to see them talk about their explorers and their discoveries and contributions. So, I helped my guy get a costume together and thought life is great. Not so. His explorer, William Dampier (a pirate AND an explorer; seriously, he's an interesting guy) has long hair. And we need a wig. In fact, we have to have a wig or we will fail. Or pass up 5 extra credit points, whichever is the greater catastrophe. My first option (in his mind) was to go to Party City and get a wig, which we can then use for Halloween (like that'll happen), therefore justifying the cost. I laughed, then I decided to make my own. 


I had a couple of swim caps shoved in a drawer that I will probably never use again. I also had two skeins of yarn leftover from a scarf I made a while ago. I bought four skeins to make a long scarf. I only used one and a half and it was pretty darn long. Anyway, I cut the yarn into 4 foot long sections. 


I took the strands over to my sewing machine and stitched them to the swim cap. Instead of pics, here's a diagram of the stitch pattern:


Starting at the front and top of the cap, I took the full stands of yarn and stitched them down the center, stopping about 2 inches from the bottom and back of the swim cap (1). For the next lines, I cut the rest of the strands in half. Then, about 1 inch away from the center, I stitched yarn (2 & 3). Then I stitched more yarn about 1 inch away from that on either side (4 & 5). Then I stitched the final hank of yarn across the back, intersecting the other lines (6). I eyeballed it, but It would've been easier if I had marked the lines first. 

I trimmed any pieces that were sticking out where I had sewn them to the swim cap. I put the wig on my son to trim it up. Which was no easy task, as he was busy channeling Willow Smith and whipping his "hair" back and forth while singing, "I whip my hair back and forth." Luckily, the wig held up to the abuse and I did not have strangle him with it. 

It was a little fuller than I expected; I probably didn't need to use that much yarn. But I thought it looked good and was happy. But, good old William Dampier had CURLY hair. So, I wet it, braided it and popped it in the dryer and let it sit overnight.
Since I don't have a mannequin head handy, I used a tall vase and an upside down ice cream bucket to rest it on. It had the added benefit of freaking out the dog (seriously funny to see a big bad Rottweiler growling and barking at a wig). I had to shut the door to my craft room or the idiot would've growled at it all night.

I unbraided it and it was wavier. Not as wavy as I had hoped, but it worked. Here's William Dampier in all his glory:


I consider this wig a success, considering I winged it.  Sometimes, I amaze myself. And he looked awesome at his wax museum. I was very proud of him. Even though he thought my suggestion to be authentic and use a British accent was "stupid."

Until the next project, 
Chris :)

Sunday, April 27, 2014

Spring Housecleaning The DIY Way!

For my semi-annual rip-the-house-apart-and-clean-everything-behind-it-and-put-it-all-back-again cleaning, I decided to try some earth friendly and homemade cleaning products. I've always wanted to try it. They're cheap, easy to make and better for the environment than the store bought chemist-made stuff. But do they work? Well, let me tell you how it went down...

After some extensive research, I decided to go with baking soda, white vinegar, castile soap and some essential oils. Obviously, you can find baking soda and vinegar at the grocery and everybody knows what they are (and if you've answered no to both, maybe you shouldn't be trying this). Castile soap is a plant based soap that is good for the environment and tough on dirt (haha, I sound like a cheesy commercial). You can find it in the organic aisle of your grocery store and in some stores in with the cleaning supplies. Mrs. Meyers and Dr. Bronner are two good brands and they have some wonderful scents. I got Mrs. Meyers lavendar this time around, but I'm thinking next time I'm going with Dr. Bronners almond. My grocery store carries essential oils in the organic aisle, but you can also find them online. Amazon has TONS of them. I picked sweet orange and spearmint for this because the were two of the cheapest and I wanted to be sure this worked before I tried the more expensive oils. One of them was $25.00 for a 1/2 ounce! It will be a cold day in the underworld before I ever spend that! I do not care how fantastic it smells!


Let's start with castile soap. I've been using castile soap for a year now as a countertop cleaner and I love it! Castile soap is concentrated, so it needs to be diluted. About four tablespoons to eight ounces of water is a good ratio. I also used it to scrub down my cabinets, floors, walls, bathroom counters, microwave, fridge, outsides of the toilets and my wooden bannisters and railings. Mix it with a little baking soda to make a paste and scrub down sinks, tubs and tile showers. This stuff smells great and everything is so clean! 

I used the vinegar in a spray bottle with some newspaper to clean my mirrors and windows and they looked amazing! And the vinegar smell really doesn't linger too long, so you don't feel like you're living inside a pickle jar. You can also use 1 part vinegar to 1 part water as an all purpose cleaner, but you need to be careful as to which surfaces you use it on, because vinegar can damage some surfaces. Me, I prefer my castile soap. It smells soooo good.

I cleaned and freshened my sink and tub drains by pouring some baking soda down the drain (I'd say a couple of tablespoons), then pouring in some vinegar and watched it bubble and foam. Which was so cool to watch. You let it sit for half an hour or so then you rinse with hot water. It seemed to work. My kitchen drain smelled better. 

Next I tried apple cider vinegar in the toilets. You just pour it in and let it sit, then swish and flush. This is supposed to leave your bathroom smelling like apples. I was really skeptical about that. And guess what? My bathroom smelled like apple cider vinegar! Color me surprised. And it cleaned ok, but for the toilet bowls, I'm sticking with chemicals. 

I made my own vacuum-up carpet powder with baking soda and essential oil. Just mix together one 16 oz. box of baking soda with approximately 20-30 drops of essential oil. Mix it well and make sure you do not have big clumps. I put mine in a mason jar and used a hammer to pound holes in the lid. I liked that part. Stress relief. Sprinkle generously all over your carpet and let it sit for 15-30 minutes, then vacuum it up. It worked great! I couldn't smell dog! As much as I love my fuzzy huggable puppy dog, I am not all that thrilled about dog smell. It also works great on your mattress! Just sprinkle and vacuum as you would the carpet.

Finally, I made my own Febreze. I like Febreze, but my kids go nuts with it. Really nuts. As in I get a bottle Saturday and by Tuesday, it's gone. Just mix two tablespoons of baking soda with 20 drops of essential oil. Mix it very well, then put it in a spray bottle with 2 cups of hot water. Shake to dissolve and BOOM, you've got yourself some DIY Febreze! I used it just like I would the store bought stuff. Now, the scent of the sweet orange oil didn't really last that long, but odors were gone. The spearmint lasted longer. And the house smelled minty fresh, like it just gargled with Scope. But I liked it.

So, my experiment with DIY cleaners turned out pretty well (except for the apple cider vinegar toilet). I'm going to keep on cleaning the DIY way because it's cheaper and environmentally friendly! And I like a minty fresh house. Except I then crave a stick of chewing gum.

Until the next project, 

Chris :)

Friday, April 18, 2014

A Penny Saved Is A Penny Urned...A Vase Upcycled With...Pennies!

I really, really, really want my kitchen backsplash tiled with pennies. I have seen pics of floors and backsplashes tiled with pennies and I love the different shades of copper, from a muted, aged copper to the bright, shiny glow of new pennies. I love the way it glitters and glows and changes, depending on the angle. It would look perfect with my counters and cabinets. But, alas, my husband does not share this passionate love for penny tiling. In fact, I believe the words "Hell no!" were used. So, I decided to try to cover a beat-up vase. At least I might get some sense of gratification. 

Now, this vase has seen better days. It's dinged, scratched and just looking sad. And I hate to blow money on a new one, because I'm cheap frugal. Besides, why buy a new one when you can pimp out an old one? This is a metal vase painted to look like hammered copper, which looked good when I first bought it, but, like a die-hard sun worshipper, isn't aging so well and could use a face lift.


All you need are a vase, some pennies and glue. I used Gorilla Glue super glue cuz I like Gorilla Glue. Just make sure your glue is made for bonding metal to whatever surface your vase is. This means reading the backs of many glue labels. And I used some wheat pennies too, after I made sure they weren't the valuable ones (unfortunately, none were).

Some of my pennies were kinda yucky, so I washed them in a solution of vinegar and baking soda. I didn't really measure; I poured vinegar into a bowl to cover the pennies, then dumped in some baking soda and watched it fizz. I think the vinegar alone would've worked fine, but I like to watch the baking soda fizz. I let them sit, then rinsed them with water. Some were still really yucky, so I cleaned them with Tarn-X. I washed my vase with soap and water and wiped it down with rubbing alcohol to make sure the surface was clean. 

And now, we glue...


I spread an old sheet on the floor so I would not get any glue on the carpet. I have never gotten super glue on the carpet, but it's not something I would like to experience. Read the instructions on the back of your glue to see if you need to hold your pennies in place. My glue said to clamp pieces together for 10 to 30 seconds. I just dabbed a drop on the vase, set the penny on and pressed lightly for a few seconds. I did have a few pennies I had to hold longer, but overall, it was pretty quick.

As you can see, there is a rim around the bottom of my vase, so I centered the pennies and glued them down alternating heads and tails. Then above the rim, I lined up the pennies with the rim and started alternating them too. And for all you idiots who say, "You have way too much time on your hands if you can sit around and do this!" I say bite me. While you're sitting on your butt watching your shows and snack-a-lacking away, I'm sitting on mine watching my shows and doing this stuff. And I'm not porking out cuz of all those sugary, fat-laden treats. I do crafts while watching TV cuz I love, love, LOVE my sugary, fat-laden goodies. A lot. And this keeps them away from me.

Seriously, this did not take long at all, once I got into the groove. Just one episode of Adam 12 and two Dance Moms. 


As you can see, if you turn your head sideways (!*#%$*! picture) I alternated the pattern. You don't have to be that obsessive. I'm just anal retentive like that.

As you can see below, the back of the vase is messed up, cuz the pennies don't go around the vase evenly. But I figured I'd just turn that part towards the wall and no one would see it. I could've cut pennies to fit, but seriously, I'm not that anal.


And now, she is done. I just sprayed it with a coat of acrylic sealer to keep the pennies from tarnishing. All the instructions for penny tiling floors and backsplashes use several coats of poly to protect the pennies, so I figured I would too.


I love this vase now! I love the way it glitters and glows when the sunlight hits it! But I still lust for a copper penny backsplash :(

Until the next project, 
Chris :)

Tuesday, April 8, 2014

Cheap and Easy Linen Tea Towels (Hand Towels, Whatever)

As I was idly roaming around the web one day, I found this fabric store (www.fabric-store.com) online that sells linen for really great prices and they sent me an email stating that for one day only, I could get a yard of their best-selling linen for $1.00. Now, I love a good deal. So heck yeah, I jumped on that! While I was on the site, I also discovered they have a "Doggie Bag" section where you can get pieces of linen in anywhere from tenth to half yard sizes (only caveat is it's often limited in weights and colors). So for about $30.00, I got 10 different pieces of linen in 10  gorgeous colors! The smallest piece was a quarter yard. Now I had all this lovely, lovely fabric to play with. I decided to try tea towels for my first linen project, cuz it looked so easy.


I used unbleached linen and a creamy beige called "cloud cream." Sounds like a paint color. The weight is a medium weight. The lightweight is too flimsy for towels and the heavyweight just didn't feel right for towels to me. When I first got the linen, it was stiff and I was wondering what, exactly, was I to make from this stuff? Ok, maybe I didn't say stuff :) I washed and dried it twice before sewing it to preshrink it. And, baby, did it ever soften up! I was a much happier puppy after that. 

I started by cutting out 27" x 17" rectangles. I used my rotary cutter and straight edge so I would get nice, clean straight edges. Then I folded over the longer sides 1/4", ironed them and then again folded and ironed 1/4".  I pinned it and took it over to my beloved sewing machine and stitched close to the edge. Well, the first time I didn't and it looked like, well, poo (or something less polite than that). So, I whined, complained, ripped out the seams and stitched it properly. 


Looks much better! I was impressed with myself and pretty darn happy at how well this was going. Then I did the corners...

I cut all corners at approximately 45 degree angles, then you are supposed to fold and iron 1/4" twice just like you did to the long sides. Didn't work as easily as the tutorial said it would. I got a little better with each towel, but I still had to fudge a few corners. Eventually, I got the hang of it. 


 Yes, I know this pic sucks.

After I stitched the short sides, I decided to be creative. My machine has decorative stitches which I have never used. So, I decided to put some decorative stitching across the bottom. This was a new experience for me. You can't mash the pedal to the floor and zip through this! You need to keep a nice, steady pace or else this happens...


I didn't even try to rip this out and start again. I just did it on the other end. This end will go towards the back, where no one will see it. Easy fix (or lazy, call it what you will).

Here are the finished edges. Next time, I'm using some nice cotton ribbon or fabric strips. It will be faster and easier.  


I'm happy with the way these turned out, after some minor trials and tribulations. I really like the way the look and feel and they wash up nicely. Now I have lots of linen left over and I'm going to search out some more projects. As if I don't have a big enough list already. 

Chris :)

Monday, March 31, 2014

Bling and Lace Upcycled Jean Shorts

My daughter loves clothes. Girly, trendy clothes. She saw some shorts with lace cutouts on the leg that she loved. I about fell over when I saw the price tag. Holy schlamoly, dinner for two at a nice restaurant costs less than these shorts. And that includes martinis and dessert. I knew I could do them for a lot less. So I went for it. 

Luckily, she had a pair of jeans that were a little too short, so all we had to do was find some lace. We went to our local closeout store to look for something lacy. And cheap. I'm not spending good money on something I'm going to chop up. Oh, my no. We found a pink lace shirt for $7.00. Life was good.


I started off by hacking off the legs of the jeans. I used another pair of her shorts to make sure I didn't make them too short. No daughter of mine is wearing Daisy Dukes. At least I'd better not find out about it. Then I tossed them in the washer and dryer so the edges would fray. 

I cut out two v-shaped notches on the sides of the legs and pinned in pieces of the lace, making sure to use the hem of the shirt, so I wouldn't have to re-hem it. Then, off to my trusty sewing machine to sew it in place.


I still had a lot of shirt left and felt the shorts needed a little something, so I cut out some more pieces and pinned them inside the front pockets. This I couldn't do on my sewing machine; I had to do it by hand. Luckily, it didn't take long. Yes, I know the pic sucks. So does my camera.


I thought I was done, until my girly girl tried on the shorts and we realized they were too small in the thighs and inseam. Not pretty. A smiling crotch is not a happy crotch, if you know what I mean. It made no sense, cuz she has other jean shorts that are the same brand and size. So I took one of those pairs and tried again. 

So, I finished the other pair of shorts and decided it needed some bling. I like bling. Tasteful bling, that is. I don't like the "attacked by a Bedazzler" look. I found some silver beads and some pink crystal beads and came up with a pattern.


I glued the beads down first with a tiny dab of beading glue, let it dry, then stitched the beads in place. The glue helps hold the beads in place when I'm sewing, and they stay put where I placed them. Then I turned the shorts inside out and washed and dried them to make sure everything stayed put. Which it did.


Here are both pairs of finished shorts. My girl loves them, especially because they're unique! And I only spent $7.00 for these! Not a bad deal! I am awesome. And modest :)

Until my next project, 
Chris :)