Sunday, August 31, 2014

"Life Is Better" Recycled Book Art

It's been a while since my last post, but that's not due to a lack of projects. Quite the contrary! I have done so many projects that you are going to be hit with a lot of blog posts all at once! As I've said before, since I work in a school cafeteria, I have off all summer. And since I have off all summer, I don't get paid (which pretty much sucks). So, I've been upcycling and making over all summer. Nothing is safe. I have old frames sitting around taking up valuable storage space. And I have blank walls. So, I killed two birds with one stone and decided to make art with one of the empty frames. At least my version of art. It may never grace the Louvre, but I like it.


My first work of "art" celebrates my beautiful boy, Tazer. For me, life truly is better with a rottweiler. For you, life may be better with another breed,or a cat, or children, or a hobby. That's the beauty of this particular project. You can tailor it specifically to you. And it is EASY. And looks great. So here's how...

All you need for this project is a picture frame, a glue stick, something for your background and lettering. For my background, I chose to use a rottweiler book. We have quite a few. Whenever I'd take the kids to the bookstore, my daughter would choose a rottweiler book. Seriously. No Junie B. Jones or Babysitters Club for this kid. Anyway, I looked over all our books for one with black and white pages. I didn't want any color photographs distracting from the lettering. I carefully cut out my pages and chose some for my background. Then I arranged and re-arranged until I was satisfied with the way it looked, then I glued it down.


You don't have to use book pages for your background. You could use scrapbook paper, wrapping paper, candy wrappers, pretty much anything your imagination can come up with for the background. 

Next, I used letter stencils and traced out the lettering, using heavy scrapbook paper in red (of course). Then I painstakingly cut them out. This took a bit of time. And yes, I know this picture sucks. I think I'll ask Santa for a new camera for Christmas. I've been good ;)


You could also use a stencil to paint your letters or use stickers. I already had the letter stencils and the paper on hand and figured I wouldn't have to shell out any moolah. 'Cause I don't get paid all summer. 

So, after I rested my cramping fingers (seriously, it was a long, drawn out affair) I measured out where I wanted to place my letters. I did several dry runs before I got it figured out. 

Using my glue stick,  I glued down the letters along the left side first, using a piece of wood as my guide.


I then glued down the letters along the bottom using a ruler as my guide. After I finished that, I just slid my ruler up to the next row and glued it down, and then the next row and finally the last row. 


Now, I needed glass so I could put it in the frame and hang it! I was on my way to Lowe's to get a piece of glass, but I stopped at Salvation Army first and found a framed picture in the size I needed for $7.00. That's $3.00 cheaper than the glass alone at Lowe's! So, I snagged it. I figured I could use the frame for something else later.


And the more I looked at the frame, the more I thought I liked it better than the plain black frame I had. So I painted it black and put my art in the frame.


I did hang it, but I couldn't resist taking this picture of my inspiration with the finished project.  He is such a snuggle puppy :)

And I re-used both the Salvation Army picture and my original frame. I just flipped the picture over, sprayed the back with two coats of primer, then painted it with chalkboard paint, popped it in the frame and hung it. Now my son has a chalkboard above his desk. Which he can use when I get him some chalk. Which I will. Eventually. 


Until the next project, 
Chris :)

Thursday, July 10, 2014

$8.00 River Rock Doormat and Rustic Twine Wreath

Since I work in an elementary school cafeteria, I have the summer off. Woo hoo! But, since I'm not working, I don't get paid. Boo hoo! So I have all this time off to work on all my crafty projects, but not a lot of $$$$ to spend. Sucks to be me. This is when upcycling and the dollar store come in handy! I decided my front door needed a face lift. And I gave it one for $8.00. Can't beat that!


As you can see, my front door is boring. Nothing interesting about it.


And my doormat has definitely seen better days! I love the seasonal coir doormats, but they always fade and don't hold up longer than one season. And I'm way too cheap to keep shelling out every couple months for a new one. I've seen river rock spa bathmats and decided I could  reuse the rubber shell to make a river rock door mat. I went to the dollar store and bought 5 bags of river rock for, yep, $5.00. I used the multi-colored ones, not the all black ones, because I thought they would look better with my house. I also scrounged around my patio, because we have some river rocks around the border of it. Unfortunately, there are a multitude of creepy crawly bugs living under those rocks. I still shudder when I think of the big, shiny red centipide that lives in there. Ewww.

All I did was rip out the coir insert, clean out the inside and started gluing rocks down. I used a marine adhesive that I just happened to have in my craft stash. I have many kinds of glue. Unbelievable just how many different kinds there are! Since this will be outside, I wanted a waterproof glue with a strong hold. I also had a bunch of rocks left over that weren't flat enough to use on my mat. I didn't want any that stuck up too much.


Here is the finished mat. I love it! Especially since it only cost me $5.00. 

I decided I needed a wreath for my front door. Since my front door does not have a storm door and gets a lot of direct sunlight, I didn't want to spend a lot. Plus, if I make it cheaply, I will then be able to make more wreaths to fit every season/holiday/mood.  I decided to go simple and rustic for this wreath.

I've seen people use foam tubing from the plumbing dept at the hardware store to make wreath forms and was going to do that, but as I walked into the dollar store, I saw them. Pool noodles. Only a dollar. Well, hello beautiful, you're coming home with me...


I thought I'd duct tape the ends together and that would be that. As you can see, that didn't work. I thought I'd try putting something in the ends to keep the seam from separating, that might work. My son has a massive stash of markers, half of which don't work anymore. I wrapped some double stick tape around one, jammed it in the ends and duct taped within an inch of its life. Worked like a charm. 


Then I used twine that I also bought at the dollar store. I used 2 boxes for a grand total of $2.00. I just tied it on and started wrapping. And then just kept on wrapping. And wrapping. And wrapping. Dollar store twine is thin, so it took a bit.

After I finished wrapping, I rooted through my fabric scraps for some fabric to make flowers for my wreath. I went with red (no surprise there) and cream.


I grabbed a cookie cutter and traced out 21 flowers, 7 for each flower. I folded 4 of the flowers into quarters and placed them on another flower (see below) and stitched them down with one stitch at the corner of each fold. You could also use glue if you'd prefer.


Then I folded the remaining 2 flowers into quarters and stitched them down as shown below. Then I fluffed them up, puttting a stitch in here and there as needed to keep it up and fluffed. Glue works here too!


After I finished all my flowers (I made six total, three of each color) I stitched them onto my wreath. I also added a piece of wire to use as a hanger. I did discover I needed to put my hanger where I put the marker in, or it would not be balanced.


Not bad for $3.00, eh? I really like it! 

I searched through my garage and found two large pots to use for planters. I had these in my sunroom with some beautiful large plants in them, but my dog would not stop digging in the dirt around them. Plants do not like that. At all. Lucky for me, I saved the pots! 

Here is the almost finished front door. I just need to get flowers to put in the pots. Eventually, I will. 

So there you have it, my upcycled dollar store makeover! Now all I have to do is make a different wreath and change out whatever I have in the pots for every season/holiday/mood!

Until the next project, 
Chris :)

Wednesday, June 11, 2014

Make An Awesome Paper Dahlia Wreath For Cheap!

I've been seeing these gorgeous dahlia wreaths (actually, more of a giant flower than a wreath) all over Pinterest and Facebook. They look really easy to make and, best of all, cheap! And they make a statement. I decided to make a red one for the inside of my front door. I'm thinking Mother Nature will not be kind to paper and hot glue, so inside it goes instead of outside. 


 I really like the multi-colored ones, but for my first try, I went with one color. Red. I love red. It's such a cheery, energetic color. You can use any kind of cardstock or heavy paper you wish. One of my favorite craft stores had scrapbook paper on sale 8/$1.00 (yowza!) and I used 16 pieces, so my wreath cost me $2.00. That's right, $2.00! You can't buy awesome like this for $2.00. 


All you need is cardstock or heavy paper, glue (I personally like my glue gun) and an 8" or 9" cardboard circle (I cut one out of an old box using my cake pans as a template).  I used my rotary cutter to cut my 12" x 12" sheets of paper into fourths, giving me 6" squares. Different tutorials cut the paper into different size squares.  It doesn't matter how big your square is, as long as it's a square and NOT a rectangle. Now you need to roll each square into a cone. Which is not as easy as I was expecting. It took me four tries to get a good looking cone. Do not worry about making the bottom closed up like an ice cream cone. Mine were a little open, as you can see in the next picture. They kind of resemble a lopsided cannoli, without all the yummy, creamy, chocolate chip-studded filling. After I did my perfect cone, I couldn't get the next two to come out right, so I got the utterly brilliant idea to wrap the remaining squares around the perfect cone as kind of a mold. That way they all came out the same and life was good.

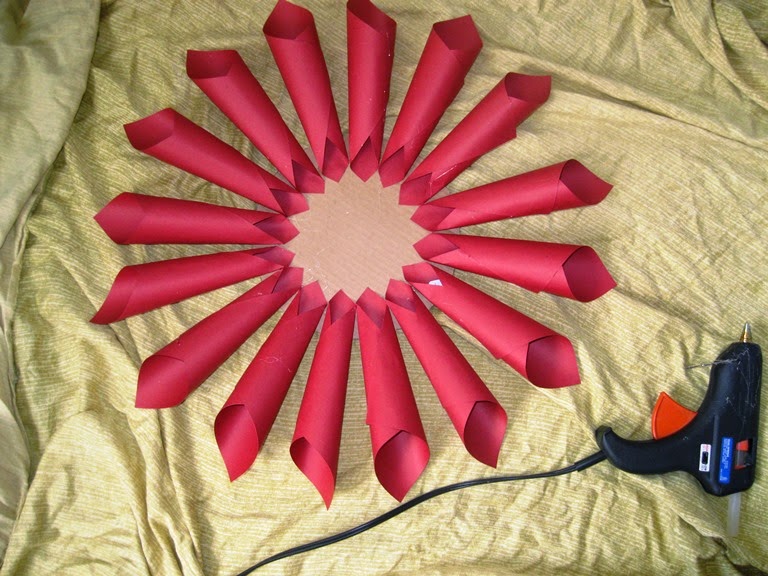
Next, I hot glued the cones around the edge of the cardboard circle.


Then I did the second row, flattening and slightly bending the tip before I glued it down.


Now it's starting to look like a flower! I just continued flattening and bending the tips and gluing the cones in circles, until I got to the center and then I glued in the last three cones to form the center. I then realized I need a loop for hanging. I looked at the wreath from every angle, decided which was its best side (whatever you want to call it), made a kid hold it so I wouldn't crush it while I glued a hanging loop on the back.


I just used a piece leftover pink piping that was too little to use for another project, but was too big for me to justify tossing. Which was lucky for me because I don't have to use any of my good ribbon for this. 

I absolutely LOVE the end result!


As soon as scrapbook paper goes on sale again (like I'm paying full price) I'm making one in sea glass colors for my sunroom! This was so easy (once I got the hang of making the damn cones) and super cheap! And it looks stunning!

Until the next project, 
Chris :)

Tuesday, May 27, 2014

Bungee Cord Dog Collar Re-Using Old Collar Parts

My dog, Tazer Gunn, is a big boy. He's outgrowing all his collars at an alarming rate and finding cool new collars isn't easy. He needs an x-large and the inexpensive ones are boring, while the cool ones are god-awful expensive. I just happened to be wandering the clearance aisles of Michael's and found bungee cord on clearance for just 49 cents per 16 foot bundle! Score! I've seen bungee collars, and figured I could do that too. So I picked out two colors I thought would look good together, until my son informed me that boy dogs DO NOT wear aqua blue. Even if it's only a small amount in a black and white pattern. So, I ditched the blue for red. And I do like red. But I still think the aqua would've looked cooler.


Looks pretty good, right? I decided to use a friendship bracelet technique to make the collar. I have no idea what type of bracelet this is, I just did it from memory. 


All you need is two colors of bungee cord (I used about 14 ft of each color to make a 30 inch collar), a piece of rope for the center about 6 inches longer that the length of your collar (mine was leftover from an ill-fated dog toy attempt), collar parts (I used a collar Tazer outgrew) and something to hook your collar on while you're working on it (I used a board with a cup hook screwed into it. I used to use it to make friendship bracelets for my daughters). 

I started by knotting all three cords together and attaching to the cup hook. Then I started tying my knots. I realized that my center rope was not working - way too slippery and the outside started bunching up too much. I went to the garage and stole, I mean, borrowed a piece of nylon rope from my husband's work bench. That worked out much better.


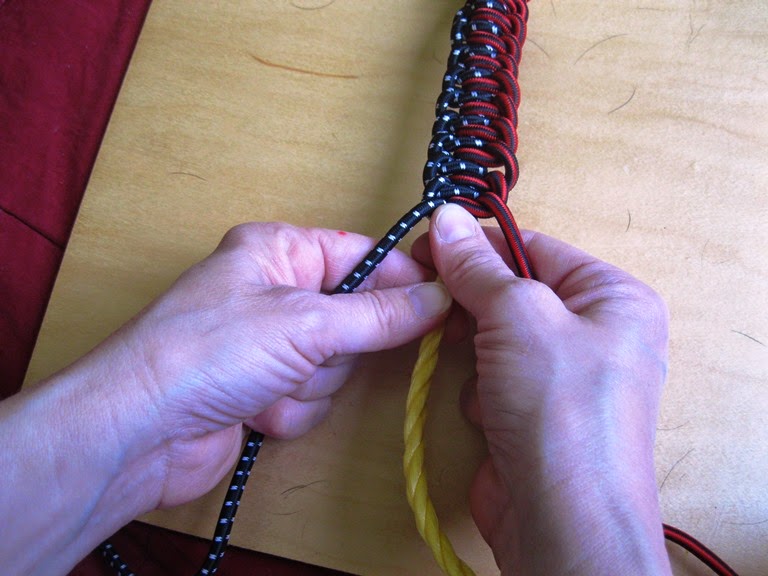
I started with the right cord. I looped it over the yellow rope, then under the yellow rope and then over itself, as shown above. And yes, that is Tazer hair all over the board. He desperately wanted to see what I was doing.


Then I pulled it tight. I did the same thing with the left side.


Every couple of knots, you'll want to tighten them up. To do this, just grasp a cord in each hand and pull the yellow cord down with your thumb forefinger, while you push up with your other thumb and forefinger. You don't have to push too hard. Just a nice gentle push works fine. Keep doing this until your collar reaches its desired length.


Pretty quick and easy, right? Just blowing through this and feeling smug that this is so easy and I'll be done in no time! But now I need to attach the clasp. Talk about turning the air blue...

All you gotta do is thread the cords and rope through the slots. HA! The bungee cords were easy enough, but the rope was a *&^%!  And wait til you get to the other end of the collar. After you unknot the first knot you made, you need to thread it through the other half of the clasp! Which is the one you have to thread through the first slot, then a second slot. And while you're at it, make sure when you thread the second clasp,  you have it facing the same way as the first. It's extremely, extremely maddening to realize you have to undo, then redo a clasp because they're facing opposite directions.  After all the contortions threading it, now you need to weave the ends under the first couple knots. Thankfully, bungee cords are stretchy, or I would  not have finished this. Seriously, I was quite hostile after trying to thread them on the clasps and if weaving them under the knots would've been as difficult, I would've probably burst a blood vessel. I kid you not


After I did that, I trimmed the ends of the yellow rope and melted it together with a lighter. Which I would only recommend with a nylon rope, otherwise you could end up with a flaming mess. The bungee cords I tied together using a surgeon's knot, which is just a double overhand knot. See how to do it http://beadwork.about.com/od/howtos/ss/surgeons_knot_2.htm


See how handsome my big boy looks? That makes it worth the all the frustration! 

Until the next project, 
Chris :)

Sunday, May 18, 2014

Distressed "Vintage" Rustic Mason Jar Bookends

I have a lot of cookbooks. And I don't want them cluttering up my valuable counter space. And the space above my cabinets is largely unused, except for a few decorative items. So I stored them on top of my cabinets, using mason jars filled with dried beans as bookends. I even painted the lids red, so they would match my kitchen. But, as you can see, that was a disaster...


But with a little paint and sandpaper, my cookbooks now look like this...


Before, every couple of days, I'd have to haul a chair over and straighten the *&%#! things up. The cookbooks were too heavy for the jars. I thought about putting rocks in, but then you would see them in a clear jar. It needed to be opaque.  I've seen distressed, rustic-looking mason jars on etsy and loved them. But I'm too cheap to even think of paying $7-$8 per jar when I can make them for a lot less. When buy it, when you can make it? I was looking for a matte red spray paint in a cherry red color, not dark red, not orangey red and not hi-gloss super shiny red. That, my friends, was not an easy task. I just happened to be wandering through Michael's (or was it Joann? I'm always at one or the other) with a coupon burning a hole in my pocket, when I found it (cue heavens opening and angels singing). Chalky finish paint. And they showed a distressed mason jar project. I was obviously looking for the wrong thing all along, so I was pretty happy that the craft gods saw fit to smile upon me.

I went home and routed through all my canning jars (I can every summer and I have loads of them) looking for ones that had chips and stains (I wouldn't use those for canning anyway) and found some that I assume were vintage. I did check to make sure that none of them were rare, valuable jars that could fund my children's college educations. But none of them were. Bummer.

Chalky finish paint is a water-based paint that can be used on a multitude of surfaces and is easy to distress. It's a little thicker than craft paint. I used a foam brush to apply it, taking care to smooth out the streaks. 


The first coat looks very streaky; it takes about four coats to get full coverage. And I didn't have to wait too long between coats, maybe 20-30 minutes. After four coats on the jars, I flipped them over and painted the necks. This way, I got coverage that went all the way to the bottom of the jar without getting paint all over my hands (and everything else). 


I let the jars dry overnight, then got out my medium grit sanding block and went to work.

I just distressed the logo so it would stand out. I didn't want to distress it anywhere else, since I was putting rocks in it. If I were using it as a vase, I would probably distress it more. Here you can see the difference...


After I sanded these babies, I needed to seal them so the paint wouldn't become scratched. I had a satin finish sealer on hand, so I tried it on one jar. It was too shiny, so I had to put on decent, presentable clothes and venture out and get matte finish. That looked perfect. Once you seal it, you can use it as a vase, but do not submerge or use soap and water to clean the outside. Just a wipe down will do.


After that was done, I went outside, found some rocks  (heavy and cheap!) and filled up the jars, screwed on the lids, and I was done! My cookbooks stay put and my kitchen looks organized and awesome. Which is pretty darn cool, if you ask me!

Until the next project, 
Chris :)

Monday, May 12, 2014

DIY Wig Using Yarn And An Old Swim Cap!

My son's class is doing a wax museum at school this week. Each kid picked an explorer, researched and wrote a biography about him (or her). Now they are dressing up as their explorer and parents, grandparents and other students will come to see them talk about their explorers and their discoveries and contributions. So, I helped my guy get a costume together and thought life is great. Not so. His explorer, William Dampier (a pirate AND an explorer; seriously, he's an interesting guy) has long hair. And we need a wig. In fact, we have to have a wig or we will fail. Or pass up 5 extra credit points, whichever is the greater catastrophe. My first option (in his mind) was to go to Party City and get a wig, which we can then use for Halloween (like that'll happen), therefore justifying the cost. I laughed, then I decided to make my own. 


I had a couple of swim caps shoved in a drawer that I will probably never use again. I also had two skeins of yarn leftover from a scarf I made a while ago. I bought four skeins to make a long scarf. I only used one and a half and it was pretty darn long. Anyway, I cut the yarn into 4 foot long sections. 


I took the strands over to my sewing machine and stitched them to the swim cap. Instead of pics, here's a diagram of the stitch pattern:


Starting at the front and top of the cap, I took the full stands of yarn and stitched them down the center, stopping about 2 inches from the bottom and back of the swim cap (1). For the next lines, I cut the rest of the strands in half. Then, about 1 inch away from the center, I stitched yarn (2 & 3). Then I stitched more yarn about 1 inch away from that on either side (4 & 5). Then I stitched the final hank of yarn across the back, intersecting the other lines (6). I eyeballed it, but It would've been easier if I had marked the lines first. 

I trimmed any pieces that were sticking out where I had sewn them to the swim cap. I put the wig on my son to trim it up. Which was no easy task, as he was busy channeling Willow Smith and whipping his "hair" back and forth while singing, "I whip my hair back and forth." Luckily, the wig held up to the abuse and I did not have strangle him with it. 

It was a little fuller than I expected; I probably didn't need to use that much yarn. But I thought it looked good and was happy. But, good old William Dampier had CURLY hair. So, I wet it, braided it and popped it in the dryer and let it sit overnight.
Since I don't have a mannequin head handy, I used a tall vase and an upside down ice cream bucket to rest it on. It had the added benefit of freaking out the dog (seriously funny to see a big bad Rottweiler growling and barking at a wig). I had to shut the door to my craft room or the idiot would've growled at it all night.

I unbraided it and it was wavier. Not as wavy as I had hoped, but it worked. Here's William Dampier in all his glory:


I consider this wig a success, considering I winged it.  Sometimes, I amaze myself. And he looked awesome at his wax museum. I was very proud of him. Even though he thought my suggestion to be authentic and use a British accent was "stupid."

Until the next project, 
Chris :)

Sunday, April 27, 2014

Spring Housecleaning The DIY Way!

For my semi-annual rip-the-house-apart-and-clean-everything-behind-it-and-put-it-all-back-again cleaning, I decided to try some earth friendly and homemade cleaning products. I've always wanted to try it. They're cheap, easy to make and better for the environment than the store bought chemist-made stuff. But do they work? Well, let me tell you how it went down...

After some extensive research, I decided to go with baking soda, white vinegar, castile soap and some essential oils. Obviously, you can find baking soda and vinegar at the grocery and everybody knows what they are (and if you've answered no to both, maybe you shouldn't be trying this). Castile soap is a plant based soap that is good for the environment and tough on dirt (haha, I sound like a cheesy commercial). You can find it in the organic aisle of your grocery store and in some stores in with the cleaning supplies. Mrs. Meyers and Dr. Bronner are two good brands and they have some wonderful scents. I got Mrs. Meyers lavendar this time around, but I'm thinking next time I'm going with Dr. Bronners almond. My grocery store carries essential oils in the organic aisle, but you can also find them online. Amazon has TONS of them. I picked sweet orange and spearmint for this because the were two of the cheapest and I wanted to be sure this worked before I tried the more expensive oils. One of them was $25.00 for a 1/2 ounce! It will be a cold day in the underworld before I ever spend that! I do not care how fantastic it smells!


Let's start with castile soap. I've been using castile soap for a year now as a countertop cleaner and I love it! Castile soap is concentrated, so it needs to be diluted. About four tablespoons to eight ounces of water is a good ratio. I also used it to scrub down my cabinets, floors, walls, bathroom counters, microwave, fridge, outsides of the toilets and my wooden bannisters and railings. Mix it with a little baking soda to make a paste and scrub down sinks, tubs and tile showers. This stuff smells great and everything is so clean! 

I used the vinegar in a spray bottle with some newspaper to clean my mirrors and windows and they looked amazing! And the vinegar smell really doesn't linger too long, so you don't feel like you're living inside a pickle jar. You can also use 1 part vinegar to 1 part water as an all purpose cleaner, but you need to be careful as to which surfaces you use it on, because vinegar can damage some surfaces. Me, I prefer my castile soap. It smells soooo good.

I cleaned and freshened my sink and tub drains by pouring some baking soda down the drain (I'd say a couple of tablespoons), then pouring in some vinegar and watched it bubble and foam. Which was so cool to watch. You let it sit for half an hour or so then you rinse with hot water. It seemed to work. My kitchen drain smelled better. 

Next I tried apple cider vinegar in the toilets. You just pour it in and let it sit, then swish and flush. This is supposed to leave your bathroom smelling like apples. I was really skeptical about that. And guess what? My bathroom smelled like apple cider vinegar! Color me surprised. And it cleaned ok, but for the toilet bowls, I'm sticking with chemicals. 

I made my own vacuum-up carpet powder with baking soda and essential oil. Just mix together one 16 oz. box of baking soda with approximately 20-30 drops of essential oil. Mix it well and make sure you do not have big clumps. I put mine in a mason jar and used a hammer to pound holes in the lid. I liked that part. Stress relief. Sprinkle generously all over your carpet and let it sit for 15-30 minutes, then vacuum it up. It worked great! I couldn't smell dog! As much as I love my fuzzy huggable puppy dog, I am not all that thrilled about dog smell. It also works great on your mattress! Just sprinkle and vacuum as you would the carpet.

Finally, I made my own Febreze. I like Febreze, but my kids go nuts with it. Really nuts. As in I get a bottle Saturday and by Tuesday, it's gone. Just mix two tablespoons of baking soda with 20 drops of essential oil. Mix it very well, then put it in a spray bottle with 2 cups of hot water. Shake to dissolve and BOOM, you've got yourself some DIY Febreze! I used it just like I would the store bought stuff. Now, the scent of the sweet orange oil didn't really last that long, but odors were gone. The spearmint lasted longer. And the house smelled minty fresh, like it just gargled with Scope. But I liked it.

So, my experiment with DIY cleaners turned out pretty well (except for the apple cider vinegar toilet). I'm going to keep on cleaning the DIY way because it's cheaper and environmentally friendly! And I like a minty fresh house. Except I then crave a stick of chewing gum.

Until the next project, 

Chris :)