Friday, September 5, 2014

Dry Erase Paint Chip Calendar and Memo Boards

I like to be an organized person. I like to know what's coming up and what's going on without any last minute surprises. And, I have a lot of picture frames just taking up space. I read  that you can use dry erase markers on glass and realized I could use my picture frames to make dry erase boards to help keep me informed as to what's going on! And, once again, it's free! Because I have all the stuff here to make them! 

First, I made a dry erase paint chip calendar from an old 24" x 36" frame. 


Ok, so this wasn't completely free; I did have to buy the glass, which was only $10 at Lowe's. And while I was at Lowe's, I picked up the paint chips. I asked the guy at the paint counter about paying for the chips since I was taking a lot, and he said they were there for the customers to take. I don't think he realized how many I wanted. I got several shades of red, thinking I wanted to do an all red color scheme, but I wasn't all that thrilled with the way it looked. So, I went back and got more colors and finally decided on a bright color scheme. I got about seven chips of seven different colors to make this. You also need something for the background, I used some muslin from my stash, duct tape, a glue stick and spray adhesive.


I used the spray adhesive to lightly spray my board and smoothed the muslin over it. Do this outside! The spray gets everywhere and the fumes are pretty strong. Really strong. Then I flipped it over and duct taped it down. I seriously love duct tape. There is so much to do with it. 

I tried several different layouts of my paint chips before I came up with one I liked. I decided to cut them down so they would fit better. Make sure to leave a space at the top to write the month and the days of the week. I almost didn't :) You need seven columns of five for seven days of the week and five weeks in a month.


I used my board and ruler to line them up and keep them straight, just like I did with the lettering for my "Life Is Better With A Rottweiler" art. I used the glue stick to glue them down to the muslin. Then just pop that baby in the frame, write the month, days of the week and dates and BOOM, you're good to go!

Next, I made a dry erase grocery list.  I got this frame on clearance with the intention of using it with the collage mat that came with it.  But it's the perfect size to fit beside my pantry so I can write down things as I realize I'm going to need them. it's right there so I can write things down as I realize I needed  them. I don't have to hunt for paper and then forget what the heck I needed by the time I find some. All I did for this was find a piece of fabric, use spray adhesive on the backing, smooth the fabric on,  duct tape it down, pop it in the frame and hang it up. Super easy and fast. Almost instantaneous gratification.


Finally, I made two dry erase boards for my fridge so I can keep track of my daughters' work schedules. I did the same thing as the grocery list board, using two different colors of fabric so I could tell whose schedule is whose at a glance. Only this time I added magnetic tape to the back so it would stick to the fridge. I had that in the craft stash too. I have no idea why I ever bought it in the first place. Actually, I have tons of stuff in the craft stash like that. 


So now I'm more organized and on top of things. At least that's how I feel. And it was easy and, best of all, cheap. Just take a look around and see what you can repurpose!

Until the next project,
Chris :)

Tuesday, September 2, 2014

Pillow with an Oversize Flower Made From Fabric Scraps

After 5 years, I'm finally decorating my living room. Oh, I have a sofa, loveseat, coffee table, end tables and all that stuff. What I need is the finishing touches. My living room still looks pretty much like it did when we first moved in. So far, all I've done are throw pillows. I'm still working on a hanging light, curtains and some floor pillows. And I need wall art. But today, I'll show you my flower pillow. I decided to make pillow covers instead of buying new pillows because, a) my family (i.e.kids and dog) are hard on my pillows and b) why buy it when you can make it? and c) why would I spend $40 for a gorgeous pillow cover that my kids are going to beat each other senseless with?

 
 It is pretty awesome, right?

I went through my fabric stash and found a piece of muslin just big enough to cover my pillow. Then I found an old red tablecloth that has a tear and a stain on it that would be perfect for the flower.  I figured out how big I wanted my flower to be, then using a dinner plate, I traced out a circle on the front section of my pillow. Using a drinking glass, I traced and cut out lots and lots of circles out of the tablecloth for the flower petals. I used my rotary cutter to cut all those circles in half. Now, the real fun begins....


I lined up my petals with the outer edge of the dinner plate circle and pinned them down. Don't worry if the petals don't come out exactly even - they probably won't. And I am not going to take the time to figure out measurements so they will...partially because I HATE math, partially because I will then have to do this for every row and I am far too lazy to do that. And I truly hate math.


As you can see, they did not come out perfectly; I overlapped some so it wouldn't be quite so off.

Then, just sew the petals down. I used my sewing machine. You could also use fabric glue, but I want them to stay on while my kids are pounding each other with the pillow. After you finish this row, do another 5 - 6 rows the same way as the first, just don't line it up the exactly with the first row. Stagger the petals as I have below.


 When you get to this point, when you pin and sew (or glue) your petals, pinch them in the center so they have a little dimension. I found it was easier to pinch each petal and sew it down, one at a time, rather than pinching and pinning them down all at once, then sewing. The pins need to go sideways in order to keep the pleat in place and that's really tough (and painful) to do with a sewing machine.


For the very center, I cut out four whole circles, quarter-folded them, then stitched them in by hand to make the center of my flower.


I made a simple envelope pillow cover so I could easily slip it on and off for washing. Plus, I didn't have to sew any buttonholes or zippers. All you have to do is fold over the sides, pin and sew! Just make sure your flower is centered and on the INSIDE when you sew. It's a real pain to rip the seams out and start again. Not that I would know that from personal experience. Turn right side out and voila! Pillow cover!


Stuff your pillow inside and admire your handiwork. 


 Now, three days after I finished this, I noticed it had sticky stuff on it. THREE DAYS. Seriously? And it just magically appeared. In the dead of night. So, I washed it. Like an idiot, I tossed it in on the regular cycle, then in the dryer. It was a mess. I had to iron it and it now looks like a carnation. I still like it. Not as much as before, but hey, live and learn. Next time (and I'm sure there will be a next time), I will put it in on the delicate cycle and lay it flat to dry! 


Until the next project, 
Chris :)

Sunday, August 31, 2014

"Life Is Better" Recycled Book Art

It's been a while since my last post, but that's not due to a lack of projects. Quite the contrary! I have done so many projects that you are going to be hit with a lot of blog posts all at once! As I've said before, since I work in a school cafeteria, I have off all summer. And since I have off all summer, I don't get paid (which pretty much sucks). So, I've been upcycling and making over all summer. Nothing is safe. I have old frames sitting around taking up valuable storage space. And I have blank walls. So, I killed two birds with one stone and decided to make art with one of the empty frames. At least my version of art. It may never grace the Louvre, but I like it.


My first work of "art" celebrates my beautiful boy, Tazer. For me, life truly is better with a rottweiler. For you, life may be better with another breed,or a cat, or children, or a hobby. That's the beauty of this particular project. You can tailor it specifically to you. And it is EASY. And looks great. So here's how...

All you need for this project is a picture frame, a glue stick, something for your background and lettering. For my background, I chose to use a rottweiler book. We have quite a few. Whenever I'd take the kids to the bookstore, my daughter would choose a rottweiler book. Seriously. No Junie B. Jones or Babysitters Club for this kid. Anyway, I looked over all our books for one with black and white pages. I didn't want any color photographs distracting from the lettering. I carefully cut out my pages and chose some for my background. Then I arranged and re-arranged until I was satisfied with the way it looked, then I glued it down.


You don't have to use book pages for your background. You could use scrapbook paper, wrapping paper, candy wrappers, pretty much anything your imagination can come up with for the background. 

Next, I used letter stencils and traced out the lettering, using heavy scrapbook paper in red (of course). Then I painstakingly cut them out. This took a bit of time. And yes, I know this picture sucks. I think I'll ask Santa for a new camera for Christmas. I've been good ;)


You could also use a stencil to paint your letters or use stickers. I already had the letter stencils and the paper on hand and figured I wouldn't have to shell out any moolah. 'Cause I don't get paid all summer. 

So, after I rested my cramping fingers (seriously, it was a long, drawn out affair) I measured out where I wanted to place my letters. I did several dry runs before I got it figured out. 

Using my glue stick,  I glued down the letters along the left side first, using a piece of wood as my guide.


I then glued down the letters along the bottom using a ruler as my guide. After I finished that, I just slid my ruler up to the next row and glued it down, and then the next row and finally the last row. 


Now, I needed glass so I could put it in the frame and hang it! I was on my way to Lowe's to get a piece of glass, but I stopped at Salvation Army first and found a framed picture in the size I needed for $7.00. That's $3.00 cheaper than the glass alone at Lowe's! So, I snagged it. I figured I could use the frame for something else later.


And the more I looked at the frame, the more I thought I liked it better than the plain black frame I had. So I painted it black and put my art in the frame.


I did hang it, but I couldn't resist taking this picture of my inspiration with the finished project.  He is such a snuggle puppy :)

And I re-used both the Salvation Army picture and my original frame. I just flipped the picture over, sprayed the back with two coats of primer, then painted it with chalkboard paint, popped it in the frame and hung it. Now my son has a chalkboard above his desk. Which he can use when I get him some chalk. Which I will. Eventually. 


Until the next project, 
Chris :)

Thursday, July 10, 2014

$8.00 River Rock Doormat and Rustic Twine Wreath

Since I work in an elementary school cafeteria, I have the summer off. Woo hoo! But, since I'm not working, I don't get paid. Boo hoo! So I have all this time off to work on all my crafty projects, but not a lot of $$$$ to spend. Sucks to be me. This is when upcycling and the dollar store come in handy! I decided my front door needed a face lift. And I gave it one for $8.00. Can't beat that!


As you can see, my front door is boring. Nothing interesting about it.


And my doormat has definitely seen better days! I love the seasonal coir doormats, but they always fade and don't hold up longer than one season. And I'm way too cheap to keep shelling out every couple months for a new one. I've seen river rock spa bathmats and decided I could  reuse the rubber shell to make a river rock door mat. I went to the dollar store and bought 5 bags of river rock for, yep, $5.00. I used the multi-colored ones, not the all black ones, because I thought they would look better with my house. I also scrounged around my patio, because we have some river rocks around the border of it. Unfortunately, there are a multitude of creepy crawly bugs living under those rocks. I still shudder when I think of the big, shiny red centipide that lives in there. Ewww.

All I did was rip out the coir insert, clean out the inside and started gluing rocks down. I used a marine adhesive that I just happened to have in my craft stash. I have many kinds of glue. Unbelievable just how many different kinds there are! Since this will be outside, I wanted a waterproof glue with a strong hold. I also had a bunch of rocks left over that weren't flat enough to use on my mat. I didn't want any that stuck up too much.


Here is the finished mat. I love it! Especially since it only cost me $5.00. 

I decided I needed a wreath for my front door. Since my front door does not have a storm door and gets a lot of direct sunlight, I didn't want to spend a lot. Plus, if I make it cheaply, I will then be able to make more wreaths to fit every season/holiday/mood.  I decided to go simple and rustic for this wreath.

I've seen people use foam tubing from the plumbing dept at the hardware store to make wreath forms and was going to do that, but as I walked into the dollar store, I saw them. Pool noodles. Only a dollar. Well, hello beautiful, you're coming home with me...


I thought I'd duct tape the ends together and that would be that. As you can see, that didn't work. I thought I'd try putting something in the ends to keep the seam from separating, that might work. My son has a massive stash of markers, half of which don't work anymore. I wrapped some double stick tape around one, jammed it in the ends and duct taped within an inch of its life. Worked like a charm. 


Then I used twine that I also bought at the dollar store. I used 2 boxes for a grand total of $2.00. I just tied it on and started wrapping. And then just kept on wrapping. And wrapping. And wrapping. Dollar store twine is thin, so it took a bit.

After I finished wrapping, I rooted through my fabric scraps for some fabric to make flowers for my wreath. I went with red (no surprise there) and cream.


I grabbed a cookie cutter and traced out 21 flowers, 7 for each flower. I folded 4 of the flowers into quarters and placed them on another flower (see below) and stitched them down with one stitch at the corner of each fold. You could also use glue if you'd prefer.


Then I folded the remaining 2 flowers into quarters and stitched them down as shown below. Then I fluffed them up, puttting a stitch in here and there as needed to keep it up and fluffed. Glue works here too!


After I finished all my flowers (I made six total, three of each color) I stitched them onto my wreath. I also added a piece of wire to use as a hanger. I did discover I needed to put my hanger where I put the marker in, or it would not be balanced.


Not bad for $3.00, eh? I really like it! 

I searched through my garage and found two large pots to use for planters. I had these in my sunroom with some beautiful large plants in them, but my dog would not stop digging in the dirt around them. Plants do not like that. At all. Lucky for me, I saved the pots! 

Here is the almost finished front door. I just need to get flowers to put in the pots. Eventually, I will. 

So there you have it, my upcycled dollar store makeover! Now all I have to do is make a different wreath and change out whatever I have in the pots for every season/holiday/mood!

Until the next project, 
Chris :)

Wednesday, June 11, 2014

Make An Awesome Paper Dahlia Wreath For Cheap!

I've been seeing these gorgeous dahlia wreaths (actually, more of a giant flower than a wreath) all over Pinterest and Facebook. They look really easy to make and, best of all, cheap! And they make a statement. I decided to make a red one for the inside of my front door. I'm thinking Mother Nature will not be kind to paper and hot glue, so inside it goes instead of outside. 


 I really like the multi-colored ones, but for my first try, I went with one color. Red. I love red. It's such a cheery, energetic color. You can use any kind of cardstock or heavy paper you wish. One of my favorite craft stores had scrapbook paper on sale 8/$1.00 (yowza!) and I used 16 pieces, so my wreath cost me $2.00. That's right, $2.00! You can't buy awesome like this for $2.00. 


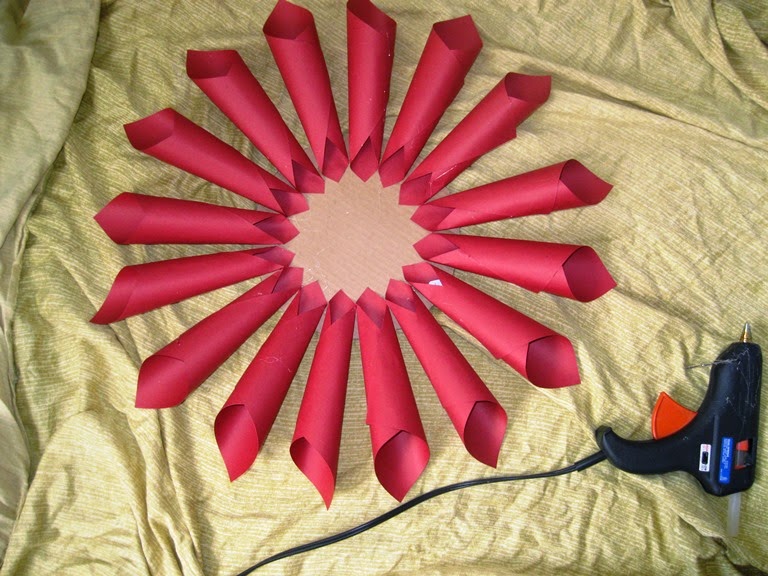
All you need is cardstock or heavy paper, glue (I personally like my glue gun) and an 8" or 9" cardboard circle (I cut one out of an old box using my cake pans as a template).  I used my rotary cutter to cut my 12" x 12" sheets of paper into fourths, giving me 6" squares. Different tutorials cut the paper into different size squares.  It doesn't matter how big your square is, as long as it's a square and NOT a rectangle. Now you need to roll each square into a cone. Which is not as easy as I was expecting. It took me four tries to get a good looking cone. Do not worry about making the bottom closed up like an ice cream cone. Mine were a little open, as you can see in the next picture. They kind of resemble a lopsided cannoli, without all the yummy, creamy, chocolate chip-studded filling. After I did my perfect cone, I couldn't get the next two to come out right, so I got the utterly brilliant idea to wrap the remaining squares around the perfect cone as kind of a mold. That way they all came out the same and life was good.

Next, I hot glued the cones around the edge of the cardboard circle.


Then I did the second row, flattening and slightly bending the tip before I glued it down.


Now it's starting to look like a flower! I just continued flattening and bending the tips and gluing the cones in circles, until I got to the center and then I glued in the last three cones to form the center. I then realized I need a loop for hanging. I looked at the wreath from every angle, decided which was its best side (whatever you want to call it), made a kid hold it so I wouldn't crush it while I glued a hanging loop on the back.


I just used a piece leftover pink piping that was too little to use for another project, but was too big for me to justify tossing. Which was lucky for me because I don't have to use any of my good ribbon for this. 

I absolutely LOVE the end result!


As soon as scrapbook paper goes on sale again (like I'm paying full price) I'm making one in sea glass colors for my sunroom! This was so easy (once I got the hang of making the damn cones) and super cheap! And it looks stunning!

Until the next project, 
Chris :)

Tuesday, May 27, 2014

Bungee Cord Dog Collar Re-Using Old Collar Parts

My dog, Tazer Gunn, is a big boy. He's outgrowing all his collars at an alarming rate and finding cool new collars isn't easy. He needs an x-large and the inexpensive ones are boring, while the cool ones are god-awful expensive. I just happened to be wandering the clearance aisles of Michael's and found bungee cord on clearance for just 49 cents per 16 foot bundle! Score! I've seen bungee collars, and figured I could do that too. So I picked out two colors I thought would look good together, until my son informed me that boy dogs DO NOT wear aqua blue. Even if it's only a small amount in a black and white pattern. So, I ditched the blue for red. And I do like red. But I still think the aqua would've looked cooler.


Looks pretty good, right? I decided to use a friendship bracelet technique to make the collar. I have no idea what type of bracelet this is, I just did it from memory. 


All you need is two colors of bungee cord (I used about 14 ft of each color to make a 30 inch collar), a piece of rope for the center about 6 inches longer that the length of your collar (mine was leftover from an ill-fated dog toy attempt), collar parts (I used a collar Tazer outgrew) and something to hook your collar on while you're working on it (I used a board with a cup hook screwed into it. I used to use it to make friendship bracelets for my daughters). 

I started by knotting all three cords together and attaching to the cup hook. Then I started tying my knots. I realized that my center rope was not working - way too slippery and the outside started bunching up too much. I went to the garage and stole, I mean, borrowed a piece of nylon rope from my husband's work bench. That worked out much better.


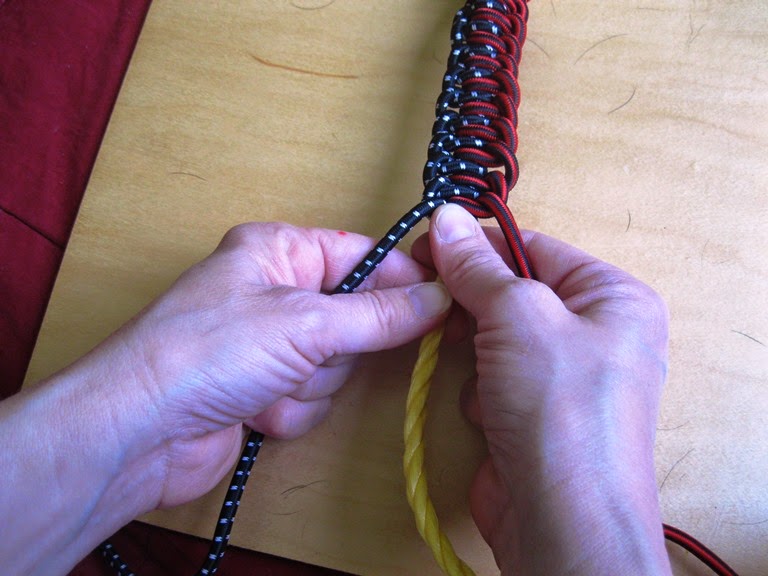
I started with the right cord. I looped it over the yellow rope, then under the yellow rope and then over itself, as shown above. And yes, that is Tazer hair all over the board. He desperately wanted to see what I was doing.


Then I pulled it tight. I did the same thing with the left side.


Every couple of knots, you'll want to tighten them up. To do this, just grasp a cord in each hand and pull the yellow cord down with your thumb forefinger, while you push up with your other thumb and forefinger. You don't have to push too hard. Just a nice gentle push works fine. Keep doing this until your collar reaches its desired length.


Pretty quick and easy, right? Just blowing through this and feeling smug that this is so easy and I'll be done in no time! But now I need to attach the clasp. Talk about turning the air blue...

All you gotta do is thread the cords and rope through the slots. HA! The bungee cords were easy enough, but the rope was a *&^%!  And wait til you get to the other end of the collar. After you unknot the first knot you made, you need to thread it through the other half of the clasp! Which is the one you have to thread through the first slot, then a second slot. And while you're at it, make sure when you thread the second clasp,  you have it facing the same way as the first. It's extremely, extremely maddening to realize you have to undo, then redo a clasp because they're facing opposite directions.  After all the contortions threading it, now you need to weave the ends under the first couple knots. Thankfully, bungee cords are stretchy, or I would  not have finished this. Seriously, I was quite hostile after trying to thread them on the clasps and if weaving them under the knots would've been as difficult, I would've probably burst a blood vessel. I kid you not


After I did that, I trimmed the ends of the yellow rope and melted it together with a lighter. Which I would only recommend with a nylon rope, otherwise you could end up with a flaming mess. The bungee cords I tied together using a surgeon's knot, which is just a double overhand knot. See how to do it http://beadwork.about.com/od/howtos/ss/surgeons_knot_2.htm. 


See how handsome my big boy looks? That makes it worth the all the frustration! 

Until the next project, 
Chris :)