Tuesday, May 27, 2014

Bungee Cord Dog Collar Re-Using Old Collar Parts

My dog, Tazer Gunn, is a big boy. He's outgrowing all his collars at an alarming rate and finding cool new collars isn't easy. He needs an x-large and the inexpensive ones are boring, while the cool ones are god-awful expensive. I just happened to be wandering the clearance aisles of Michael's and found bungee cord on clearance for just 49 cents per 16 foot bundle! Score! I've seen bungee collars, and figured I could do that too. So I picked out two colors I thought would look good together, until my son informed me that boy dogs DO NOT wear aqua blue. Even if it's only a small amount in a black and white pattern. So, I ditched the blue for red. And I do like red. But I still think the aqua would've looked cooler.


Looks pretty good, right? I decided to use a friendship bracelet technique to make the collar. I have no idea what type of bracelet this is, I just did it from memory. 


All you need is two colors of bungee cord (I used about 14 ft of each color to make a 30 inch collar), a piece of rope for the center about 6 inches longer that the length of your collar (mine was leftover from an ill-fated dog toy attempt), collar parts (I used a collar Tazer outgrew) and something to hook your collar on while you're working on it (I used a board with a cup hook screwed into it. I used to use it to make friendship bracelets for my daughters). 

I started by knotting all three cords together and attaching to the cup hook. Then I started tying my knots. I realized that my center rope was not working - way too slippery and the outside started bunching up too much. I went to the garage and stole, I mean, borrowed a piece of nylon rope from my husband's work bench. That worked out much better.


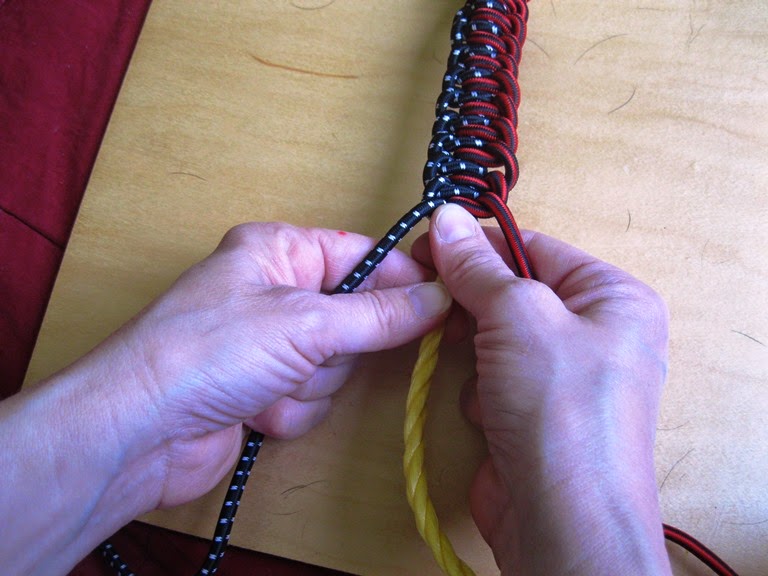
I started with the right cord. I looped it over the yellow rope, then under the yellow rope and then over itself, as shown above. And yes, that is Tazer hair all over the board. He desperately wanted to see what I was doing.


Then I pulled it tight. I did the same thing with the left side.


Every couple of knots, you'll want to tighten them up. To do this, just grasp a cord in each hand and pull the yellow cord down with your thumb forefinger, while you push up with your other thumb and forefinger. You don't have to push too hard. Just a nice gentle push works fine. Keep doing this until your collar reaches its desired length.


Pretty quick and easy, right? Just blowing through this and feeling smug that this is so easy and I'll be done in no time! But now I need to attach the clasp. Talk about turning the air blue...

All you gotta do is thread the cords and rope through the slots. HA! The bungee cords were easy enough, but the rope was a *&^%!  And wait til you get to the other end of the collar. After you unknot the first knot you made, you need to thread it through the other half of the clasp! Which is the one you have to thread through the first slot, then a second slot. And while you're at it, make sure when you thread the second clasp,  you have it facing the same way as the first. It's extremely, extremely maddening to realize you have to undo, then redo a clasp because they're facing opposite directions.  After all the contortions threading it, now you need to weave the ends under the first couple knots. Thankfully, bungee cords are stretchy, or I would  not have finished this. Seriously, I was quite hostile after trying to thread them on the clasps and if weaving them under the knots would've been as difficult, I would've probably burst a blood vessel. I kid you not


After I did that, I trimmed the ends of the yellow rope and melted it together with a lighter. Which I would only recommend with a nylon rope, otherwise you could end up with a flaming mess. The bungee cords I tied together using a surgeon's knot, which is just a double overhand knot. See how to do it http://beadwork.about.com/od/howtos/ss/surgeons_knot_2.htm


See how handsome my big boy looks? That makes it worth the all the frustration! 

Until the next project, 
Chris :)

Sunday, May 18, 2014

Distressed "Vintage" Rustic Mason Jar Bookends

I have a lot of cookbooks. And I don't want them cluttering up my valuable counter space. And the space above my cabinets is largely unused, except for a few decorative items. So I stored them on top of my cabinets, using mason jars filled with dried beans as bookends. I even painted the lids red, so they would match my kitchen. But, as you can see, that was a disaster...


But with a little paint and sandpaper, my cookbooks now look like this...


Before, every couple of days, I'd have to haul a chair over and straighten the *&%#! things up. The cookbooks were too heavy for the jars. I thought about putting rocks in, but then you would see them in a clear jar. It needed to be opaque.  I've seen distressed, rustic-looking mason jars on etsy and loved them. But I'm too cheap to even think of paying $7-$8 per jar when I can make them for a lot less. When buy it, when you can make it? I was looking for a matte red spray paint in a cherry red color, not dark red, not orangey red and not hi-gloss super shiny red. That, my friends, was not an easy task. I just happened to be wandering through Michael's (or was it Joann? I'm always at one or the other) with a coupon burning a hole in my pocket, when I found it (cue heavens opening and angels singing). Chalky finish paint. And they showed a distressed mason jar project. I was obviously looking for the wrong thing all along, so I was pretty happy that the craft gods saw fit to smile upon me.

I went home and routed through all my canning jars (I can every summer and I have loads of them) looking for ones that had chips and stains (I wouldn't use those for canning anyway) and found some that I assume were vintage. I did check to make sure that none of them were rare, valuable jars that could fund my children's college educations. But none of them were. Bummer.

Chalky finish paint is a water-based paint that can be used on a multitude of surfaces and is easy to distress. It's a little thicker than craft paint. I used a foam brush to apply it, taking care to smooth out the streaks. 


The first coat looks very streaky; it takes about four coats to get full coverage. And I didn't have to wait too long between coats, maybe 20-30 minutes. After four coats on the jars, I flipped them over and painted the necks. This way, I got coverage that went all the way to the bottom of the jar without getting paint all over my hands (and everything else). 


I let the jars dry overnight, then got out my medium grit sanding block and went to work.

I just distressed the logo so it would stand out. I didn't want to distress it anywhere else, since I was putting rocks in it. If I were using it as a vase, I would probably distress it more. Here you can see the difference...


After I sanded these babies, I needed to seal them so the paint wouldn't become scratched. I had a satin finish sealer on hand, so I tried it on one jar. It was too shiny, so I had to put on decent, presentable clothes and venture out and get matte finish. That looked perfect. Once you seal it, you can use it as a vase, but do not submerge or use soap and water to clean the outside. Just a wipe down will do.


After that was done, I went outside, found some rocks  (heavy and cheap!) and filled up the jars, screwed on the lids, and I was done! My cookbooks stay put and my kitchen looks organized and awesome. Which is pretty darn cool, if you ask me!

Until the next project, 
Chris :)

Monday, May 12, 2014

DIY Wig Using Yarn And An Old Swim Cap!

My son's class is doing a wax museum at school this week. Each kid picked an explorer, researched and wrote a biography about him (or her). Now they are dressing up as their explorer and parents, grandparents and other students will come to see them talk about their explorers and their discoveries and contributions. So, I helped my guy get a costume together and thought life is great. Not so. His explorer, William Dampier (a pirate AND an explorer; seriously, he's an interesting guy) has long hair. And we need a wig. In fact, we have to have a wig or we will fail. Or pass up 5 extra credit points, whichever is the greater catastrophe. My first option (in his mind) was to go to Party City and get a wig, which we can then use for Halloween (like that'll happen), therefore justifying the cost. I laughed, then I decided to make my own. 


I had a couple of swim caps shoved in a drawer that I will probably never use again. I also had two skeins of yarn leftover from a scarf I made a while ago. I bought four skeins to make a long scarf. I only used one and a half and it was pretty darn long. Anyway, I cut the yarn into 4 foot long sections. 


I took the strands over to my sewing machine and stitched them to the swim cap. Instead of pics, here's a diagram of the stitch pattern:


Starting at the front and top of the cap, I took the full stands of yarn and stitched them down the center, stopping about 2 inches from the bottom and back of the swim cap (1). For the next lines, I cut the rest of the strands in half. Then, about 1 inch away from the center, I stitched yarn (2 & 3). Then I stitched more yarn about 1 inch away from that on either side (4 & 5). Then I stitched the final hank of yarn across the back, intersecting the other lines (6). I eyeballed it, but It would've been easier if I had marked the lines first. 

I trimmed any pieces that were sticking out where I had sewn them to the swim cap. I put the wig on my son to trim it up. Which was no easy task, as he was busy channeling Willow Smith and whipping his "hair" back and forth while singing, "I whip my hair back and forth." Luckily, the wig held up to the abuse and I did not have strangle him with it. 

It was a little fuller than I expected; I probably didn't need to use that much yarn. But I thought it looked good and was happy. But, good old William Dampier had CURLY hair. So, I wet it, braided it and popped it in the dryer and let it sit overnight.
Since I don't have a mannequin head handy, I used a tall vase and an upside down ice cream bucket to rest it on. It had the added benefit of freaking out the dog (seriously funny to see a big bad Rottweiler growling and barking at a wig). I had to shut the door to my craft room or the idiot would've growled at it all night.

I unbraided it and it was wavier. Not as wavy as I had hoped, but it worked. Here's William Dampier in all his glory:


I consider this wig a success, considering I winged it.  Sometimes, I amaze myself. And he looked awesome at his wax museum. I was very proud of him. Even though he thought my suggestion to be authentic and use a British accent was "stupid."

Until the next project, 
Chris :)