I have FINALLY completed my biggest project so far. A hanging lamp. Made with fortune tellers. The origami kind, not the human kind. It was definitely a learning experience.
This is kinda how the whole thing went:
Now that it's done, I love it! But it took a lot of trial and error (and swearing) to finish it and fall in love with it! At one point, I ripped it apart and started over! But I'm glad I stuck with it because now I have a truly unique hanging lamp!
This is my inspiration. I wanted something different, obviously. But I decided to do this as a drum shade.
This is how mine turned out:
I love it! And once I figured out what I was doing, it was easy! I used some rabbit fencing we had left over from our garden, a lamp kit that I had bought and never used, some wire, scrapbook paper and a glue gun. I bought the scrapbook paper when it was on sale 12/$1.00, which was great, because at one point I scrapped most of my fortune tellers and started over. The lamp cost me a grand total of $9.00; it would've cost less if I hadn't had to redo part of it!
I started by shaping the wire into a cylinder, then "sewing" the ends closed with some floral wire from the dollar store.
I overlapped the squares to make sure the ends stayed closed and the whole thing stayed round.
Then I attached the light kit to the wire form. I used two pieces floral wire (also from the dollar store) and made a loop in each one that fit in between the lamp base and the screw ring.
I then attached it to the wire form. This took a bit of finagling to get it to hang level.
Next, I made my fortune tellers. Pretty easy, actually. It just took a bit of time. I took pictures of the fortune teller process, but my camera hates closeups. They came out looking like you need glasses to bring them in focus. And it drives me crazy when they look fine on the camera, but terrible when you download them. I found these directions at Vintage-Toys.co.uk
I used 12x12 sheets of the cardstock scrapbook paper instead of an 8 1/2x11 sheet. I cut each sheet into four 6x6 squares and folded away. Look at how cute they all look! I did not resist the urge to sit and play with them, which took up a few minutes (or so) of my time.
Then I got my form and started hot gluing the fortune tellers on. Let me just say you could use a regular drum shade instead of making one, but I am cheap and I challenge myself to find and recycle what I can.
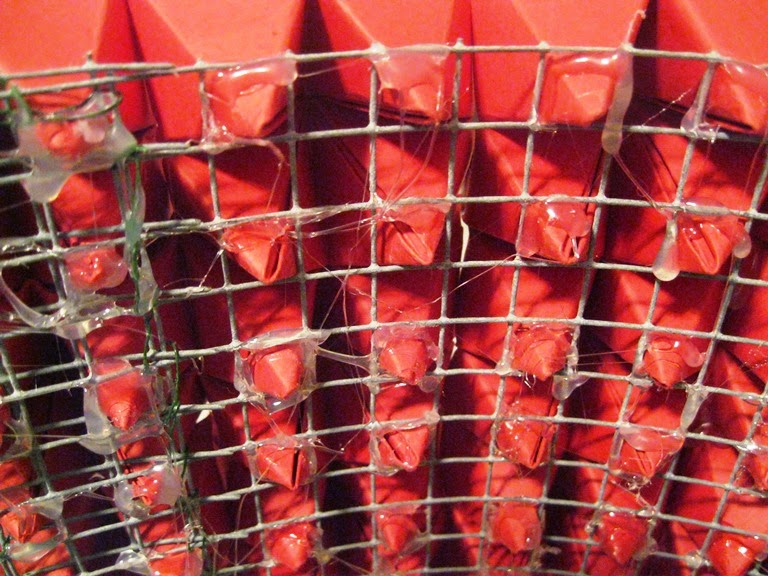
I put the tips of the fortune tellers through the squares in the wire and glued them from the back. I used the squares to align the fortune tellers.
After a bit, I noticed the fortune tellers looked haphazard and squished. This is when I first started to wonder if this would work out. I tore out the fortune tellers and started again, this time aligning them differently. No dice. They still looked squishily haphazard. I tried again. Still no go. I was highly irate. I gave myself a bit (like a few weeks) to calm down and rethink this through.
After a few weeks, I thought it might be that the cardstock was too stiff, so before I went out and bought more scrapbook paper, I tried regular printer paper. And discovered that size DOES matter! Haha! I realized that when I made my fortune tellers out of the printer paper, they were smaller and therefore fit much nicer! Instead of 6x6, I made them 5x5. So I made more and started hot gluing again. Life was once again sunny and happy.
I had a small gap (two squares of wire) at the end of the row. I glued in a strip of paper and figured I'd turn that side to the wall. I only needed about twenty four more fortune tellers when I ran out of paper. So I traipsed off to the craft store for more, never dreaming my happy little craft bubble was about to burst.
So I bought enough to finish off my lamp. I got home and realized the paper didn't match. At all. I cursed myself for buying the wrong @#%$! paper. Then I noticed the UPC label. The color and SKU code matched! No big deal, I thought. I'd just go find a close match. Easier said than done. After a few trips between my favorite craft stores, I finally picked the one that was the closest. After I got it home and made my fortune tellers, I realized that if I put them on all in one spot, it would be very noticeable. *&^%$#!
I decided to take out some of the original fortune tellers in strategic spots and replace them with the new ones. You can see the difference if you're looking for it, but it's not as noticeable as one big chunk of them all together. I was finally done and ready to hang it!!
It looks awesome! Until I turn it on. As you can see...
I am going to line it...eventually. It looks great as long as I don't turn it on. And it took sooo long to finish it and then to get it hung up that I 'm just enjoying it. Plus, I am thoroughly sick of dealing with it! After a few new craft projects, I'll feel up to dealing with it again :)
Until the next project,
Chris :)