Monday, January 27, 2014

How to make felted wool balls and Fireball Bracelet

I am almost finished with my t-shirt rug; I just have to make a trip to the Salvation Army for a few more shirts, but I like cheap, so I'm waiting for 1/2 price Wednesday. In the meantime, I rummaged through my craft stash (which seems to growing) and found wool roving. I have always wanted to try felting something, and I figured why not start out easy with some beads? Then I could make one of those cool felted bead bracelets like the ones I love on Etsy. You can get wool roving at yarn shops and craft stores. Yarn shops have loads of endlessly gorgeous colors, but at craft stores your color selection is severely limited. However, if you use coupons, it's much cheaper. I got mine at Michael's with a 40% off coupon cuz I figured it's better to go cheap in case I'm a complete idiot at doing this (which, it turns out, I'm not. I'll be hitting the yarn store soon).

This is my finished Fireball bracelet, so named because I think it looks like little balls of fire. You may not. If not, you obviously don't share my creative vision :)
To make these beads, you will need wool roving (obviously), very warm, slightly soapy water, dish soap and towels. If you are a messy crafter, you may need lots of towels. 
Start by pulling off two strips of roving that are approximately the same size. If you're going to make beads, try measuring the strips so all your beads come out the same size. One tutorial said the weigh the roving, but the strips didn't register on my kitchen scale, so I just measured them. 
Start by rolling up one strip of roving, then rolling the other strip around the first, going in the opposite direction. When you're done, it should look like this:


Next, dip the ball in the very warm, slightly soapy water for a few seconds. Add a very small drop of dish soap. Seriously small. If you add too much, you've got soap foaming up and you look like you're holding a rabid chihuahua. I've learned this from experience. If that happens, just rinse gently under the faucet.Then, start rolling!

Gently roll it between your palms without putting pressure on the ball to start, or you'll end up with a lumpy, distorted ball. Once the ball begins to take shape, you can start to put more pressure on it, gradually increasing it till you have a nice, smooth, firm ball. This takes a few minutes, so try to be patient. Some tutorials also suggested rolling the ball on bubble wrap, but it's so much fun to pop and stomp on that it never lasts longer than five minutes after it's dragged out of the box, so there's never any on hand at my house. Bubble wrap is truly one of life's best simple pleasures. 


Back to my balls (I still have enough little kid in me that that makes me giggle). Here is one that I finished rolling. But this puppy not yet done. I wasn't sure if I should make the bead hole now or after it dries, so I tried it now.
I stuck a safety pin through it, but it squished, so I had to reshape it.
I made some two color beads as well. I just pulled the roving into thinner strips and mixed the strips together into two larger strips.
Here are my beads finished and ready to dry. the two smaller purple ones I tried to make into disc beads, but I can see I need more practice in that area!

 Now on to the bracelet. You will need a large darning needle and beading elastic. You may need pliers to pull the needle through the beads. I also used wood beads between the felted ones. I thought they looked cool. And I didn't have enough of the black, glossy beads I originally wanted use. Which kinda sucks. I think that would've been cooler yet.

 Now, when these babies dry, they shrink. And the hole closes up. So don't bother putting the hole in the beads while still wet. Waste of time. Plus, once the beads are dry, they don't get all squished and distorted when you ram a needle through them like they do when they're wet.
Here's the finished bracelet! I tied off the elastic and put just the teeniest dab of glue on the knot. Seriously, just a teeny, weeny dab will do. If you use more than that, it gets all over your beads and looks crappy. After all that work, do you really want it all gooked up? I use a toothpick. It's much cleaner that way.
The bracelet looks cool and gets the thumbs up from my daughter, who spirited it away to her jewelry stash. Which is ok, cuz now I get to make another one. I still have lots of roving left. As for the big purple beads, I'm going to put some essential oil on them and stash them in my lingerie drawer (which sounds better than my underwear drawer) so all my lingerie (which sounds better than my undies) smells divine. I'm just not sure what scent to use...


Hopefully, I get to the Salvation Army Store on Wednesday so I can get my t-shirt rug done and give you all the details. If not, I'll be back soon with another project from my ever-growing list!

Chris

Tuesday, January 21, 2014

Rosy Posy T-shirt with upcycled t-shirt roses

I am still working on my t-shirt rug - and am still NOT finished! I need to make a trip the the Salvation Army to get some more black t-shirts. And it's snowing and blowing out there. So, since I am trapped in the house with three crazed animals kids and a dog, I need something to do to keep myself relatively sane. So today I am making a Rosy Posy T-shirt with upcycled t-shirt roses. 
I am making this for my girly girl out of two of her old t-shirts that were bunched up in the bottom of her dresser drawers. Since she obviously wasn't wearing them, why not make them into something cool? And, as I said before, I need a distraction from my children. 
All I really did was jazz up a plain gray t-shirt with some t-shirt roses. And it's really easy!
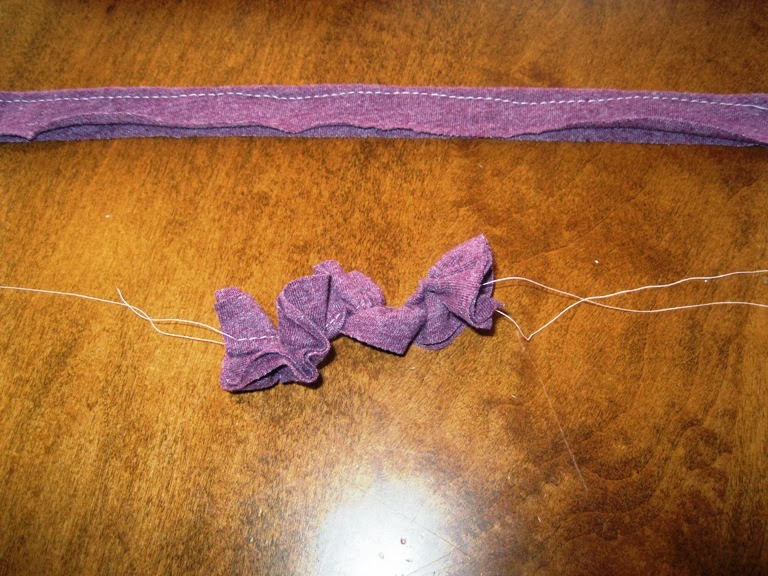
I used my handy dandy rotary cutter to slice up a burgundy t-shirt (the stuff that's too small or unusable to other craft projects got dumped in my box o' clippings to be used to stuff my floor pouf. But that's another project for another day). I made my slices about 2" wide. I then cut each slice in half, folded it lengthwise and used a basting stitch and sewed it along the fold.
 As you can see, it's not the straightest seam, but in this case it doesn't matter if you sew like a drunken loon. It'll still look good in the end.
Then you just pull the threads and gather the material into a curly, wavy strip. This is why you baste, not sew a regular seam. If you sew, you will swear when you try to gather this up. And you may have noticed that I have not uttered a single obscenity yet.
I rolled each strip up into a rose shape and stitched the bottom to keep it together. Now for the obscenities. Trying to hold the rose in place and stitch at the same time was an enormous pain in the butt. The center would suddenly pop out or I thought I was done only to realize I missed a spot so my rose looked like a japanese beetle snacked on it. After I ripped it apart and swore at it again, I came to the realization that it would be easier to stitch it as I rolled it up. It worked much better that way. I was happy. 
Here is the finished rose. Pretty cool, right? Now to make more...
I wanted to add a few leaves to some of my roses, but the greens I have didn't look right with the gray and burgundy, so I decided to go goth and add black leaves. I snagged two strips from my t-shirt rug, cut out four leaf shapes and stitched them on four roses. I placed the roses around the neckline to see how it looked best, then stitched the roses to the collar of the shirt. 
At this point, I wasn't sure I liked it! It didn't lay the way I wanted it to. But before I ripped everything apart in a frenzy of tears and self-recriminations, I had my girly girl try it on.
Once she had it on, I breathed a sigh of relief! It looked good! Of course, just about anything looks good on little Miss Size Two (yes, I am jealous). There was no need for crying or beating myself up. As a matter of fact, I may have to make more. One for me, maybe a couple for my Etsy store...hmmmm, I may need to go routing around for more t-shirts...

From the way it's snowing and blowing I don't think I'll be going anywhere anytime soon and judging from the way my little darlings are getting along, I will be back very soon with another craft for you!

Chris :)


Tuesday, January 7, 2014

They're cute and slammable...they're dammit dolls!

So I've decided my next project will be a t-shirt rug. And I'm working on it. But it's gonna take some time, and like any good, red-blooded American, I need me some instant gratification! And this rug isn't gonna be finished for a while. A long, long while. So, I needed a quick project. As I was scrolling through all the DIY pages I like on Facebook (which is quite a few, which is probably why my project list is so long), I saw a tutorial for a dammit doll. What is a dammit doll? It's a stuffed doll that you grab by the legs and slam on any available surface while screaming "DAMMIT"! I immediately thought of a friend of mine who could use a little stress relief, so I thought I would make one for her. She could really use it. And so could I after making it.

The tutorial I found used plain fabric and real doll hair. It looked like a voodoo doll. It was kinda freaky. I started out looking for some funky fabric in my craft stash and found an old pillow case with some pom pom fringe that had seen better days. I also found a scrap of flannel that I decided to use to make another one. Then I made a pattern. Which took a couple tries and some obscenities, but I did it.
So then I pinned the pattern to the fabric and cut it out. So far, pretty easy. Except maybe the pattern part.
Aren't they cute? But as I was to discover, sewing the little *&%*s! wasn't as easy as I assumed.
As you can see, I pinned the two pieces together with the right sides inside, as well as the pom pom trim for hair (also on the inside). You're probably thinking, "Thanks for the tip, Obvious Man" but I have sewn things together before with the right sides out. Then swore when I realized I had to rip all those stitches out and redo it. That bites, believe me! ANYWAY, to get back on the subject, I then took it to my sewing machine and stitched all the way around and, luckily, remembered to leave an opening so I could turn it inside out and stuff it. My problem was sewing all the tiny little curves of the hands and feet. I took it slow and easy, but the material bunched up when I tried to turn the corners. I kept stopping to fix it. It was annoying, to say the least. And the flannel kept shredding when I turned the corners, so I pitched that one.

So, here she is, after I turned her inside out and embroidered her face. Which I wish I had thought to do before I sewed her together. Live and learn. I was gonna give her button eyes, but then I thought they would scratch surfaces as she's being slammed, so I went with embroidery. My embroidery skills are not awesome (obviously), so I went with x's for eyes and a straight mouth. I figured anyone would be knocked out after having his head slammed against a hard surface, so x's seemed appropriate.

Then I stuffed the doll with fiberfill from my craft stash, using the eraser end of a pencil to push the fiberfill into the arms and legs. I stitched her closed with a simple whipstitch. I printed out a card explaining how to use her.
Viola! She is done and ready to be savagely slammed against any hard surface in an effort to relieve your rage and stress!


Her little card reads:

"When you want to kick the wall and throw the phone and shout'
Here's a little dammit doll you cannot do without,
Just grab it firmly by the legs and find a place to slam it,
And as you beat its stuffing out, yell DAMMIT, DAMMIT, DAMMIT!


I made two more, a little yellow guy out of an old t-shirt and a a puppy print from a scrap piece of fabric. The t-shirt guy looks a little distorted cuz I forgot how it stretches when you try to stuff it. And it kinda looks like a voodoo doll. Freaky. 


It made think that I should make one out of a Raven's shirt to stick pins in during Ravens games. I hate the Ravens :)

So now that I've finished my instant gratification project, I guess I'll get back to work on my t-shirt rug. 

Chris :)

Friday, January 3, 2014

Warm, Comfy Slippers from Wool Sweaters

The Crafty Adventures of The Naughty Bear

I have always loved crafts and diy projects and always am looking at new projects I want to try. But I never seem to try most of them! So my New Year's resolution is to get off my butt and do it! I have a loooong list of projects, (many, many projects) and I am determined to do at least two of them a month. Which probably will not put a dent in my list. Yeah, it's that long...


My first project is a pair of warm, comfy slippers that I made from an old wool sweater my dad gave me when they moved to Florida (cuz who needs a heavy wool sweater when it never goes below 60 degrees?). I've been looking for a pair of wool slippers, but no way in God's Green Earth am I paying big $$$$$ for slippers. If I spent that much on slippers, the dog would probably use them as a chew toy. This pair I made for my daughter.


These are super easy to do, even for the craftily challenged! I washed my sweater multiple times in hot water and dried it on high until it shrunk and became really dense.  My next step was to find a pattern. 
You could buy a pattern, I suppose, but I wanted to do this cheap. Hey, the sweater was free, so why should I shell out for a pattern? :) I looked online at different patterns and found one that I tweaked to fit my foot. You don't need a pattern for each foot. Just one will do. Cut out your left slipper. and then flip it over to do the right. Not too hard to figure out, right? Cut out 1 top and 2 bottoms for each slipper. Like this.
Next, I used regular thread to sew together the 2 foot pieces. I found a couple tutorials that skipped this step and blanket stitched everything together, but I found that the pieces kept slipping and was getting really irritated that I kept having to realign everything every other *&%*! stitch and using inappropriate language as I was getting quite frustrated. I found that just a quick basting stitch holds everything together nicely and makes the blanket stitch that much easier. 
See? Easy. And it took almost no time at all. Then I stitched the top to the bottom.
The slippers may look done in this pic, but they're not. Unless you're lazy, then  hey, you're done. But as I said before, this is only a quick basted stitch to keep the pieces together while you blanket stitch. These puppies wouldn't hold up too well as is.
Luckily, I had some black yarn in my stash of crafty stuff (which is awesome, cuz I didn't want to shell out some $$$). You just need a darning needle or large eye needle. Then you start to blanket stitch all the way around the outside edge.
I had to check out quite a few tutorials on how to blanket stitch. And I kinda suck at it. So I won't be explaining how to do this. I found a video on YouTube that was helpful. And there are tons of places explaining how to do this. But you may already know how to do this. In that case, good for you.

My daughter loved hers, so I made myself a pair from another sweater. Here they are in all their finished glory. They are very warm and comfy and, best of all, free. I like free. If you don't have any wool sweaters you want to cut up, go to Salvation Army or thrift shops and pick up one cheap. Cheap is almost as good as free. Of course, you can also go out to the mall and buy one. Knock yourself out.

I hope you found this interesting and informative. I hope you'll come back and check my next project. I'm debating between the pom pom rug and the paper rose wreath. Or maybe the t-shirt reusable bag....